Sunday, July 1, 2012

For common MS-WORD Shortcut keysCode for the Shopping cart without having database its basically for small applications where you have to be fast and you have small no. of items to be stored
source code

<%@ Page Language="C#" AutoEventWireup="true"  CodeFile="Default.aspx.cs" Inherits="_Default" %>

<!DOCTYPE html PUBLIC "-//W3C//DTD XHTML 1.0 Transitional//EN" "http://www.w3.org/TR/xhtml1/DTD/xhtml1-transitional.dtd">

http://www.w3.org/TR/xhtml1/DTD/xhtml1-transitional.dtd">

<html xmlns="http://www.w3.org/1999/xhtml" >
<head id="Head1" runat="server">
    <title>Web Cart </title>
</head>
<body>
    <form id="form1" runat="server">
    <div>
        &nbsp;<asp:Label ID="Label1" runat="server" Height="21px" Text="Demo for Students By YASH"
            Width="288px"></asp:Label><br />
        <table>
            <tr>
                <td style="width: 100px">
                    <asp:DropDownList ID="DropDownList1" runat="server" Width="198px">
                        <asp:ListItem Value="25.50">LUX</asp:ListItem>
                        <asp:ListItem Value="45.60">MEDIMAX</asp:ListItem>
                        <asp:ListItem Value="34.75">CIBACA</asp:ListItem>
                        <asp:ListItem Value="43.50">CLOSEUP</asp:ListItem>
                    </asp:DropDownList></td>
                <td style="width: 100px">
                    <asp:Button ID="btnAdd" runat="server" Text="Add to Cart" OnClick="btnAdd_Click" /></td>
            </tr>
            <tr>
                <td colspan="2">
                </td>
            </tr>
            <tr>
                <td colspan="2" style="height: 176px">
        <asp:GridView ID="GridView1"
  ShowFooter="true" DataKeyNames="ProductId"
  AutoGenerateColumns="false" runat="server">
<Columns>
<asp:BoundField DataField="Productid" HeaderText="Product Id" />
<asp:BoundField DataField="ProductName" FooterText="Total" HeaderText="Product Name" />
<asp:TemplateField HeaderText="Unit Price" FooterStyle-Font-Bold="True">
<ItemTemplate>
  <%# GetUnitPrice(decimal.Parse(Eval("UnitPrice").ToString())).ToString("N2") %>
</ItemTemplate>
<FooterTemplate>
  <%# GetTotal().ToString("N2") %>
</FooterTemplate>
</asp:TemplateField>
</Columns>
</asp:GridView>
                </td>
            </tr>
        </table>

    </div>
    </form>
</body>
</html>


C# code

using System;
using System.Data;
using System.Configuration;
using System.Web;
using System.Web.Security;
using System.Web.UI;
using System.Web.UI.WebControls;
using System.Web.UI.WebControls.WebParts;
using System.Web.UI.HtmlControls;

public partial class _Default : System.Web.UI.Page
{
    protected void Page_Load(object sender, EventArgs e)
    {

    }
    private void DataTable()
    {
        DataTable MyDT = new DataTable();
        DataRow MyRow;
        if (ViewState["DataTable"] == null)
        {
            MyDT.Columns.Add("Productid", System.Type.GetType("System.Int32"));
            MyDT.Columns.Add("ProductName");
            MyDT.Columns.Add("UnitPrice", System.Type.GetType("System.Decimal"));
            MyRow = MyDT.NewRow();
            MyRow[0] = MyDT.Rows.Count + 1;
            MyRow[1] = DropDownList1.SelectedItem.Text;
            MyRow[2] = DropDownList1.SelectedItem.Value;
            MyDT.Rows.Add(MyRow);
        }
        else
        {
            MyDT = (DataTable)ViewState["DataTable"];
            MyRow = MyDT.NewRow();
            MyRow[0] = MyDT.Rows.Count + 1;
            MyRow[1] = DropDownList1.SelectedItem.Text;
            MyRow[2] = DropDownList1.SelectedItem.Value;
            MyDT.Rows.Add(MyRow);
        }
        ViewState["DataTable"] = MyDT;
        GridView1.DataSource = MyDT;
        GridView1.DataBind();
    }

    protected decimal TotalUnitPrice;
    protected decimal GetUnitPrice(decimal Price)
    {
        TotalUnitPrice += Price;
        return Price;
    }
    protected decimal GetTotal()
    {
        return TotalUnitPrice;
    }
    protected void btnAdd_Click(object sender, EventArgs e)
    {
        DataTable();
    }
}


For common Ms-Word shortcut keys

Www.skvzm.blogspot.com

How to Create Shopping Cart in asp.net(C#)


This article discusses how to create an order page and shopping cart page using GridView ASP.NET C# and SQL Server
  1. Create three tables:
    Screenshot - P11.gif
  2. Create a web Project
  3. Name of the Server can be anything.
  4. You can name anything to your Database.
  5. Create an Images Folder in the project solution
  6. Add some image file into the Images folder
  7. Screenshot - P2.gif
  8. Rename the Default.aspx web page to OrderPage.aspx
  9. Drag and drop GridView object from the toolbox on to the web form.
  10. Create the following GridView Columns and set the GridView AutoGenerateColumn to false.
  11. Change the Header Text to change the name of the columns in GridView
  12. Screenshot - p3.gif
  13. Where AddToCart is a button, Picture ID, Title and Date Added are text fields and PictureURL is Image field.
  14. GridView will look like this:
    Screenshot - p4.gif
  15. When the order page is loaded, all the items have to be loaded to the GridView for the user to select, copy the following code to the load page event:
    string Sel = "Select * from ItemTable"; 
    SqlConnection Con = new SqlConnection(Cn); 
    SqlCommand cmd = new SqlCommand(Sel, Con); 
    Con.Open(); 
    DataTable dt = new DataTable(); 
    dt.Columns.Add(new DataColumn("PictureID", typeof(int))); 
    dt.Columns.Add(new DataColumn("PictureURL", typeof(string))); 
    dt.Columns.Add(new DataColumn("Title", typeof(string))); 
    dt.Columns.Add(new DataColumn("DateAdded", typeof(DateTime))); 
    SqlDataReader reader = cmd.ExecuteReader(); 
    while (reader.Read()) 
    { 
    DataRow dr = dt.NewRow(); 
    dr["PictureID"] = Convert.ToInt32(reader["PictureId"]); 
    dr["PictureURL"] = ResolveUrl("~/Images/" +reader["PictureURL"]); 
    dr["Title"] = reader["Title"]; 
    dr["DateAdded"] = reader["DateAdded"]; 
    dt.Rows.Add(dr); 
    } 
    Con.Close(); 
    GridView1.DataSource = dt; 
    GridView1.DataBind(); 
    Where Cn Is the connection string.
  16. Enter some data to the SQL table:
    Screenshot - p5.gif
    Screenshot - p6.gif
  17. Build and run the application.
  18. The following result will be displayed:
    Screenshot - p7.gif
  19. AddToCart button click event:
    Screenshot - p8.gif
    Set the AddToCart button property.
  20. Add this to the GridView property using the source page or the HTML page
    OnRowCommand="GridView1_RowCommand"
  21. Add these lines of code to the page code behind:
    protected void GridView1_RowCommand(object sender, GridViewCommandEventArgs e) 
    { 
    if (e.CommandName == "AddToCart") 
    { 
    int index = Convert.ToInt32(e.CommandArgument); 
    GridViewRow row = GridView1.Rows[index]; 
    AddShopCart(row.Cells[1].Text.ToString()); 
    } 
    } 
  22. After you click the AddToCart button, you need to move the item to the shopping cart. To do that, you need to write code to make a data entry to OrderTable, since ItemId is unique. Based on ItemId we insert a data entry to the OrderTable.
  23. Before we make an entry to the table we need order Number, we can get the order number fromControlTable since ControlTable holds the last used order number.
  24. The method to insert selected item to shopping cart will get the last used order number fromControlTable, and after inserting the values to the OrderTable will update the order number in theControlTable.
    private void AddShopCart(string ItemId) 
    { 
    string ord = OrderNumber(); 
    if (ord != "Bad order") 
    { 
    int ordernumber = Convert.ToInt32(ord); 
    ordernumber += 1; 
    SqlConnection C_n = new SqlConnection(Cn); 
    SqlCommand cm = new SqlCommand("Insert INTO OrderTable VALUES
     ('" + ordernumber + "', '" + ItemId + "', '" + "101" + 
     "', '" + Convert.ToDateTime("2/19/2007") + "','" + "1" + "')", C_n); 
    C_n.Open(); 
    SqlDataReader dr = cm.ExecuteReader(); 
    C_n.Close(); 
    UpdateOrderNumber(ordernumber); 
    } 
    } 
  25. The method to get the last used order number.
    private string OrderNumber() 
    { 
    SqlConnection Or_Cn = new SqlConnection(Cn); 
    SqlCommand Or_Cm = new SqlCommand("Select OrderNumber from ControlTable", Or_Cn); 
    Or_Cn.Open(); 
    SqlDataReader Or_rd = Or_Cm.ExecuteReader(); 
    if (Or_rd.Read()) 
    { 
    return Or_rd["OrderNumber"].ToString(); 
    } 
    else 
    { 
    return "Bad order"; 
    } 
    } 
  26. The method to update the order number in the ControlTable:
    private void UpdateOrderNumber(int UpdatedNumber) 
    { 
    SqlConnection Op_Cn = new SqlConnection(Cn); 
    SqlCommand Op_Cm = new SqlCommand
     ("Update ControlTable Set OrderNumber=" + UpdatedNumber, Op_Cn); 
    Op_Cn.Open(); 
    SqlDataReader Op_rd = Op_Cm.ExecuteReader(); 
    Op_Cn.Close(); 
    } 
  27. Add new page to the project and name it ShoppingCart.aspx.
  28. Drag and drop GridView object from the toolbox on to the web form.
  29. Create the following GridView columns and set the GridView AutoGenerateColumn to false.
    Screenshot - p9.gif
  30. Where Delete is a button, Picture ID, Title, Price and Date Added are text fields and PictureURL is Image field.
  31. GridView will look like this:
    Screenshot - p10.gif
  32. Under page load event, copy the following code:
    string Sel = "Select a.* from ItemTable as a INNER JOIN 
      OrderTable as b ON a.PictureId=b.ItemId"; 
    SqlConnection Con = new SqlConnection(Cn); 
    SqlCommand cmd = new SqlCommand(Sel, Con); 
    Con.Open(); 
    DataTable dt = new DataTable(); 
    dt.Columns.Add(new DataColumn("PictureID", typeof(int))); 
    dt.Columns.Add(new DataColumn("Title", typeof(string))); 
    dt.Columns.Add(new DataColumn("Price", typeof(string))); 
    dt.Columns.Add(new DataColumn("DateAdded", typeof(DateTime))); 
    dt.Columns.Add(new DataColumn("PictureURL", typeof(string))); 
    SqlDataReader reader = cmd.ExecuteReader(); 
    while (reader.Read()) 
    { 
    DataRow dr = dt.NewRow(); 
    dr["PictureID"] = Convert.ToInt32(reader["PictureId"]); 
    dr["Title"] = reader["Title"]; 
    dr["Price"] = reader["Price"]; 
    dr["DateAdded"] = reader["DateAdded"]; 
    dr["PictureURL"] = ResolveUrl("~/Images/" + reader["PictureURL"]); 
    dt.Rows.Add(dr); 
    } 
    Con.Close(); 
    GridView1.DataSource = dt; 
    GridView1.DataBind(); 
  33. F5

Friday, June 29, 2012

How to Create Triggers in Sql server


CREATE TRIGGER Management.ForCustomers
ON Management.Customers
AFTER INSERT
AS
BEGIN
    INSERT INTO Management.DatabaseOperations
    VALUES(default, N'Customers', SUSER_SNAME(), 
        N'Processed a deposit', GETDATE())
END
GO

How to Create Stored Procedures or What is Stored Procedures in sql server

We have had an introduction to some types of actions that could be performed on a database. These actions were called functions. A function is used to perform a calculation and produce a regular value based on a data type. In fact, the default formula of a function doesn't allow it to produce a list of values. If you want a function that produces a table, you must create atable-valued function, but you may not want to deal with some of its rules. In reality, you cannot create a regular function that returns a SELECT query. Of course, the alternative is to create a view.


  1. Start the computer and log in
  2. Launch Microsoft SQL Server and click Connect
  3. Open the WattsALoan1.sql file (Watts A Loan)
  4. To create the database and its objects, right-click inside the document and click Execute
  5. Close the Query window
  6. In the Object Explorer, expand the Databases node and expand WattsALoan1
  7. Right-click Database Diagrams -> New Database Diagram
  8. When the message box comes up, read it and click Yes
  9. Right-click Database Diagram and click New Database Diagram
  10. Read the message and click Yes
  11. In the dialog box, double-click each table and, when all tables have been added, click Close

    Watts A Loan - Diagram
  12. Close the diagram
  13. When asked whether you want to save it, click Yes
  14. Set the name to dgmWattsALoan1
  15. Click OK
  16. In the Object Explorer, right-click WattsALoan1 and click New Query
  17. To see a list of payments made on different loans, type the following:
    SELECT ALL * FROM Loans.Payments;
    GO
  18. To see the result, on the main menu, click Query -> Execute
  19. Click inside the top section of the Query window and press Ctrl + A
Creating a Stored Procedure
To create a stored procedure:
  • In the Object Explorer, expand the database for which you want to create the stored procedure, expand its Programmability node, right-click Stored Procedures, and click New Stored Procedure... A Query window with a skeleton syntax would be displayed. You can then modify that code using the techniques we will learn in this lesson
  • Open an empty Query window associated with the database for which you want to create the stored procedure and display the Templates Explorer. In the Templates Explorer, expand the Stored Procedure node. Drag Create Stored Procedure and drop it in the Query window
  • Open an empty Query window associated with the database for which you want to create the stored procedure and enter the necessary code
The simplest syntax to create a stored procedure in Transact-SQL is:
CREATE PROC/PROCEDURE [SchemaName.]ProcedureName
AS
Body of the Procedure
To create a stored procedure, start with the CREATE PROCEDURE expression. You can also useCREATE PROC. Both expressions produce the same result. Like everything in your database, you must name your stored procedure:
  • The name of a procedure can be any string that follows the rules we reviewed for naming the functions
  • Refrain from starting the name of a stored procedure with sp_ because it could conflict with some of the stored procedures that already ship with Microsoft SQL Server
When creating a stored procedure, you can precede its name by a schema name. After the name of the procedure, type the AS keyword. The section, group of words, or group of lines after the AS keyword is the body of the stored procedure. It states what you want the procedure to do or what you want it to produce. It is important to keep in mind that there are many other issues related to creating a stored procedure but we will ignore them for now.
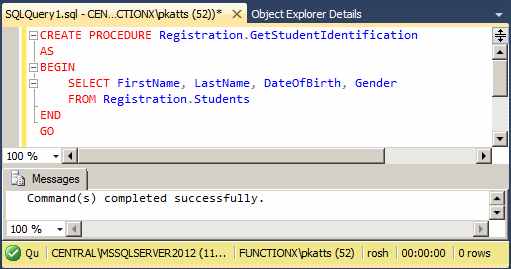
Probably the simplest procedure you can create would consist of selecting fields from a table. This is done with the SELECT operator. It uses the techniques we reviewed for data selection. For example, to create a stored procedure that would hold a list of students from a table named Students, you would create the procedure as follows:
Here is an example of creating a stored procedure:
CREATE PROCEDURE Registration.GetStudentIdentification
AS
BEGIN
    SELECT FirstName, LastName, DateOfBirth, Gender
    FROM Registration.Students
END
GO
Although you can use the * to select all fields of a table, instead, you should always create the list of columns, even if you plan to use all columns of a table.
Besides SELECT operations, in a stored procedure, you can perform any of the database operations we have applied so far. These include creating and maintaining records, etc.
Practical LearningPractical Learning: Creating a Stored Procedure
  1. To start a stored procedure, type the following:
    CREATE PROCEDURE Management.ShowInformation
    AS
        SELECT ALL * FROM Loans.Types;
        SELECT ALL * FROM Accounts.Customers;
    GO
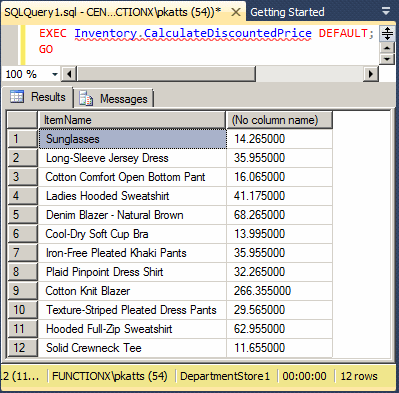
  2. To create the stored procedure, on the main menu, click Query -> Execute
Executing a Stored Procedure
After creating a stored procedure, you must store it as an object in your database. To do this visually, on the SQL Editor toolbar, you can click the Execute button Execute. If the code of the stored procedure is right, it would be created:

Stored Procedure
Also, a new node for its name would be added to the Stored Procedures section of the database.
To get the results of creating a stored procedure, you must execute it (in other words, to use a stored procedure, you must call it). To execute a stored procedure, you use the EXECUTE keyword followed by the name of the procedure. Although there are some other issues related to executing a stored procedure, for now, we will consider that the simplest syntax to call a procedure is:
EXEC/EXECUTE [SchemaName.]ProcedureName
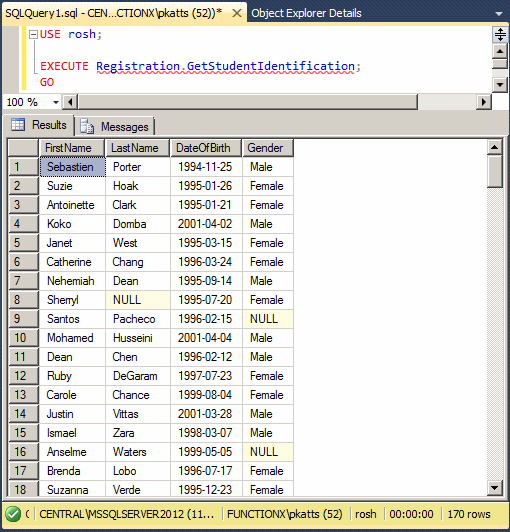
If you have a stored procedure named GetStudentIdentification, to execute it, you would type:
EXECUTE GetStudentIdentification
You can also precede the name of the procedure with its schema. Here is an example:
EXECUTE Registration.GetStudentIdentification;
Stored Procedure
You can also precede the name of the schema with the name of the database. Here is an example:
EXECUTE rosh.Registration.GetStudentIdentification;
Practical LearningPractical Learning: Executing a Stored Procedure
  1. Click inside the top section of the Query window and press Ctrl + A to select everything
  2. To execute the stored procedure, type the following
    EXECUTE Management.ShowInformation;
    GO
  3. To execute the stored procedure, right-click inside the top section of the Query window and click Execute
  4. Click inside the top section of the Query window and press Ctrl + A
Stored Procedure and Permissions
 
Introduction
To visually manage the permissions of a stored procedure, in the Object Inspector, right-click it and click Properties. In the left frame, click Permissions. In the right section of the dialog box, get a user name and view the available permissions in the bottom section:
Stored Procedure and Permissions
As you can see, a stored procedure does not have many permissions on its own. Still, permissions on stored procedures can get complicated because of the interactions a stored procedure has with the objects it uses.
To start, a developer who has to create one ore more stored procedures must have the CREATE PROCEDURE permission on the database that will own the procedure. Also, he or she must have theALTER permissions. You must also coordinate the permissions of the user on the objects used by the stored procedure.
Executing On Behalf of an Account
If a user is lacking some permissions when executing a stored procedure, he cannot use the result(s) of that procedure. As an alternative, when creating a certain stored procedure, you can specify the user account that will be used to execute the procedure. To give this instruction, before the AS keyword permission, type WITH EXECEUTE AS followed by the user name that will be used. The formula to follow is:
CREATE PROC/PROCEDURE [SchemaName.]ProcedureName
WITH EXECUTE AS Option
AS
Body of the Procedure
The options are:
  • If you want your own account to be used, use WITH EXECUTE AS SELF. This is the default for a stored procedure. In this case, your user name will be stored with the procedure and the databaseengine will call it when the sotred procedure is executed.
  • If you want the account of the user who is executing the procedure to be used, use WITH EXECUTE AS CALLER. In this case, when the user starts executing the procedure, the database engine will check whether the user has the appropriate permissions. If so, the stored procedure would execute. Otherwise, he will be denied.
  • If you want the account of the owner of the database to be used, use WITH EXECUTE AS OWNER.
  • If you want to specify the account that will be used when executing the schema, use WITH EXECUTE AS, followed by the user name. Here is an example:
CREATE USER Patricia FOR LOGIN [Central\pkatts];
GO
CREATE PROCEDURE Registration.GetContactInformation
WITH EXECUTE AS N'Patricia'
AS
SET NOCOUNT ON
    SELECT FirstName, LastName, ParentsNames
    FROM Registration.Students;    
GO
Managing Procedures
  
Introduction
When a stored procedure executes, the database engine must keep sending messages back and forth between the server and the client. These relentless interactions create overhead on the processing and in most cases are not necessary. To avoid them, after the AS keyword, add a SET NOCOUNT ON expression before starting the body of the stored procedure. The formula to follow is:
CREATE PROC/PROCEDURE [SchemaName.]ProcedureName
AS
SET NOCOUNT ON
Body of the Procedure
Here is an example:
CREATE PROCEDURE Registration.GetIdentification
AS
SET NOCOUNT ON
BEGIN
    SELECT FirstName, LastName, DateOfBirth, Gender
    FROM Registration.Students
END
GO
Although you can create and use a stored procedure without specifying a schema, it is recommended that you always use a schema. In fact, you should always create your own schema in your database and create your stored procedure in it.
Encrypting the Code of a Stored Procedure
As mentioned already, when you create a stored procedure, it becomes an object in the Object Inspector and its code is available. If you want to encrypt that code as it is stored in the database, add a WITH ENCRYPTION expression before the AS keyword. The formula to follow is:
CREATE PROC/PROCEDURE [SchemaName.]ProcedureName
WITH ENCRYPTION
AS
Body of the Procedure
Here is an example:
CREATE PROCEDURE Registration.GetStudentIdentification4
WITH ENCRYPTION
AS
SET NOCOUNT ON
    SELECT FirstName, LastName, DateOfBirth, Gender
    FROM Registration.Students;    
GO
Modifying a Stored Procedure
As a regular Microsoft SQL Server database object, you can modify a stored procedure without recreating it. To do this:
  • In the Object Explorer, right-click the procedure and click Modify
  • In the Object Explorer, right-click the procedure, position the mouse on Script Stored Procedure As -> ALTER To -> New Query Editor Window
  • Open an empty Query window associated with the database that contains the stored procedure. From the Templates Explorer, expand Stored Procedure. Drag the Alter Stored Procedure node and drop it in the empty Query window
In each case, a skeleton code would be generated for you. You can then edit it to create a new version of your stored procedure. After editing the code, you can execute the SQL statement to update the stored procedure.
In Transact-SQL, the basic formula to modify a stored procedure is:
ALTER PROCEDURE [SchemaName.]ProcedureName
AS
Body of Procedure
Recompiling a Stored Procedure
When you create a stored procedure, it considers the state of the database at that time. This includes the columns and records in the tables, the primary keys, the foreign keys, etc. It is not unusual for a user of the database to change any of these details. After such operations have occurred, the stored procedure may not be updated and may show previous details before the changes. One way you can take care of the stored procedure is to ask the database engine to recompile the stored procedure.
To ask the database engine to check the stored procedure and recompile it the next time it is executed, when creating the procedure, before the AS keyword, add a WITH RECOMPILE expression. The formula to follow is:
CREATE PROC/PROCEDURE [SchemaName.]ProcedureName
AS
WITH RECOMPILE
Body of the Procedure
Here is an example:
CREATE PROCEDURE Registration.GetStudentsByGender
WITH RECOMPILE
AS
    SET NOCOUNT ON
    SELECT FirstName, LastName, DateOfBirth, Gender
    FROM   Students
GO
Deleting a Stored Procedure
One of the characteristics of a stored procedure is that it is treated like an object in its own right. Therefore, after creating it, if you don't need it anymore, you can get rid of it.
There are various types of stored procedures, some of which are considered temporary. Those types of procedures delete themselves when not needed anymore, such as when the person who created the stored procedure disconnects from the database or shuts down the computer. Otherwise, to delete a stored procedure, you can use either the Object Explorer or SQL. As mentioned with tables, even if you create a stored procedure using the Object Explorer, you can delete it using SQL and vice-versa.
To delete a stored procedure in the Object Explorer, after expanding its database, its Programmability, and its Stored Procedure nodes, right-click the stored procedure and click Delete. You can also click it in the Object Explorer to select it and then press Delete. The Delete Object dialog box would come up to let you make a decision.
To delete a stored procedure in SQL, the syntax to use is:
DROP PROCEDURE [SchemaName.]ProcedureName
Of course, you should make sure you are in the right database and also that the ProcedureName exists.
Using Expressions and Functions
One of the advantages of using a stored procedure is that not only can it produce the same expression as we saw for data selection but also it can store such an expression to be recalled any time without having to re-write it (the expression). Based on this, you can create an expression that combines a first and a last name to produce and store a full name. Here is an example:
CREATE PROCEDURE Registration.GetStudentIdentification
AS
BEGIN
    SET NOCOUNT ON
    SELECT FullName = FirstName + N' ' + LastName,
           DateOfBirth, Gender
    FROM Registration.Students
END
GO
A stored procedure can also call a function in its body. To do this, follow the same rules we reviewed forcalling functions during data selection. Here is an example of a stored procedure that calls a function:
CREATE PROCEDURE Registration.GetStudentsAges
AS
BEGIN
    SET NOCOUNT ON
    SELECT FullName = FirstName + N' ' + LastName,
           DATEDIFF(year, DateOfBirth, GETDATE()) AS Age,
           Gender
    FROM Registration.Students
END
GO
Here is an example of executing the stored procedure:
EXEC rosh.Registration.GetStudentsAges;
GO
Stored Procedure
Arguments and Parameters
 
Introduction
All of the stored procedures we have created and used so far assumed that the values they needed were already in a table of the database. In some cases, you may need to create a stored procedure that involves values that are not part of the database. On such a scenario, for the stored procedure to carry its assignment, you would supply it with one or more values. 
An external value that is provided to a stored procedure is called a parameter. When you create a stored procedure, you must also create the parameter if you judge it necessary. When a procedure's creation is equipped with a parameter, it is said that the stored procedure takes an argument. A stored procedure can also take more than one argument.
When you execute a stored procedure that takes one or more arguments, you must provide a value for each argument. In this case, you are said to pass a value for the argument. There are cases when you don't have to provide an argument.
Passing Arguments
To create a stored procedure that takes an argument, type the formula CREATE PROCEDURE orCREATE PROC followed by the name of the procedure, then type the name of the argument starting with @. The parameter is created like a column of a table. That is, a parameter must have a name, a data type and an optional length. Here is the syntax you would use:
CREATE PROC/PROCEDURE [SchemaName.]ProcedureName
@ParameterName DataType
AS
Body of the Procedure
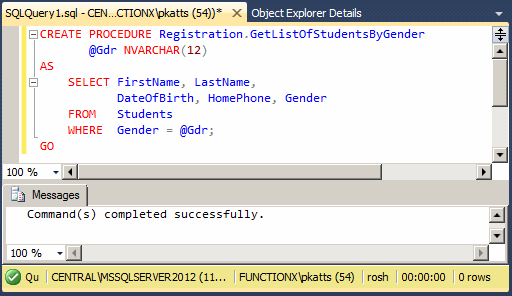
When implementing the stored procedure, in the body of the procedure, you can define what you want to do with the parameter(s). One way you can use a parameter is to run a query whose statement the user would provide. For example, imagine you want to create a stored procedure that, whenever executed, would be supplied with a gender, then it would display the list of students of that gender. Since you want the user to specify the gender of students to display, you can create a stored procedure that receives the gender. Here is an example:
CREATE PROCEDURE Registration.GetListOfStudentsByGender
       @Gdr NVARCHAR(12)
AS
    SELECT FirstName, LastName,
           DateOfBirth, HomePhone, Gender
    FROM   Students
    WHERE  Gender = @Gdr
Stored Procedure
Practical LearningPractical Learning: Creating a Stored Procedure
  1. To pass arguments to a stored procedure, type the following in the window:
    USE WattsALoan1;
    GO
    
    CREATE PROCEDURE Loans.SpecifyCurrentBalance
        @PmtDate date,
        @EmplID int,
        @LaID int,
        @PmtAmt money
    AS
    BEGIN
        -- Get the amount that was lent to the customer
        DECLARE @AmountOfLoan money;
        SET @AmountOfLoan = (SELECT las.FutureValue
                             FROM Loans.Allocations las
                             WHERE (las.AllocationID = @LaID));
    
        -- If the customer had already made at least one payment,
        -- get the current balance of the customer's account
        DECLARE @CurrentBalance money;
        SET     @CurrentBalance = (SELECT MIN(pay.Balance)
                                   FROM Loans.Payments pay
                                   WHERE (pay.AllocationID = @LaID));
    
        -- If the customer has never made a payment (yet),
        -- to specify the balance, subtract the current payment
        -- from the original amount of the loan
        IF      @CurrentBalance IS NULL
     BEGIN
         INSERT INTO Loans.Payments(PaymentDate, EmployeeID,
         AllocationID, PaymentAmount, Balance)
         VALUES(@PmtDate, @EmplID, @LaID, @PmtAmt,
         @AmountOfLoan - @PmtAmt);
     END
        -- If the customer had already at least one payment,
        -- subtract the current payment from the previous balance
        ELSE
     BEGIN
         INSERT INTO Loans.Payments(PaymentDate, EmployeeID,
               AllocationID, PaymentAmount, Balance)
         VALUES(@PmtDate, @EmplID, @LaID,
         @PmtAmt, @CurrentBalance - @PmtAmt);
     END
    END
    GO
  2. To create the stored procedure, on the main, click Query -> Execute
  3. Click inside the top section of the Query window and press Ctrl + A


Executing an Argumentative Stored Procedure
As mentioned already, when executing a stored procedure that takes a parameter, make sure you provide a value for the parameter. The syntax used is:
EXEC/EXECUTE [SchemaName.]ProcedureName ParameterValue
If the parameter is Boolean or numeric, make sure you provide the value as 0 or for a Boolean value or another number for the numeric type. If the parameter is a character or a string, type its value in single-quotes. Here is an example:
EXEC rosh.Registration.GetListOfStudentsByGender N'Male';
Here is an example of executing it:
Procedure
Notice that we could/should have omitted the Gender column in the statement since it would be implied.
Another type of stored procedure can be made to take more than one parameter. In this case, create the parameters in the section before the AS keyword, separated by (a) comma(s). The syntax you would use is:
CREATE PROC/PROCEDURE [SchemaName.]ProcedureName
@ParameterName1 DataType, @ParameterName2 DataType, @ParameterName_n DataType
AS
Body of the Procedure
Here is an example:
USE ROSH;
GO
CREATE PROCEDURE Registration.IdentifyStudentsByState
 @Gdr nvarchar(20),
 @StateOrProvince char(2)
AS
BEGIN
    SELECT FullName = LastName + ', N' + FirstName,
           DATEDIFF(year, DateOfBirth, GETDATE()) AS Age,
           Gender
    FROM Registration.Students
    WHERE (Gender = @Gdr) AND (State = @StateOrProvince);
END
GO
Stored Procedure
When calling a stored procedure that takes more than one parameter, you must still provide a value for each parameter but you have two alternatives. The simplest technique consists of providing a value for each parameter in the exact order they appear in the stored procedure. Here is an example:
USE ROSH;
GO
EXEC rosh.Registration.IdentifyStudentsByState N'Female', N'MD';
GO
This would produce:
Procedure
Alternatively, you can provide the value for each parameter in the order of your choice. Consider the following stored procedure that takes 3 arguments:
USE ROSH;
GO
CREATE PROCEDURE Registration.IdentifySomeStudents
 @Gdr nvarchar(20),
 @StateOrProvince nchar(2),
 @HomeStatus bit
AS
BEGIN
    SET NOCOUNT ON
    SELECT FullName = LastName + N', ' + FirstName,
           DATEDIFF(year, DateOfBirth, GETDATE()) AS Age,
           Gender
    FROM Registration.Students
    WHERE (Gender = @Gdr) AND 
          (State  = @StateOrProvince) AND
          (SingleParentHome = @HomeStatus);
END
GO
When calling this type of procedure, you can type the name of each parameter and assign it the corresponding value. Here is an example:
USE ROSH;
GO
EXEC Registration.IdentifySomeStudents @HomeStatus=1, @StateOrProvince=N'MD', @Gdr=N'Female';
GO
Here is an example of executing the procedure:
Stored Procedure
Practical LearningPractical Learning: Executing an Argumentative Procedure
  1. To execute the stored procedure, type the following:
    USE WattsALoan1;
    GO
    EXECUTE Loans.SpecifyCurrentBalance N'03/25/2004', 2, 1, 249.08;
    GO
    EXECUTE Loans.SpecifyCurrentBalance N'01/30/2006', 2, 5, 611.93;
    GO
    EXECUTE Loans.SpecifyCurrentBalance N'04/20/2004', 1, 1, 249.08;
    GO
    EXECUTE Loans.SpecifyCurrentBalance N'10/28/2006', 2, 4, 134.38;
    GO
  2. To execute, press F5
  3. To see a list of payments made on different loans, type the following:
    SELECT ALL * FROM Loans.Payments;
    GO
  4. To see the result, on the main menu, click Query -> Execute
  5. Click inside the top section of the Query window and press Ctrl + A
Default Arguments
Imagine you create a database for a department store and a table that holds the list of items sold in the store:
CREATE TABLE Inventory.Categories
(
    CategoryID int identity(1, 1) primary key,
    Category nvarchar(20) not null
);
GO
INSERT INTO Inventory.Categories(Category)
VALUES(N'Men'), (N'Women'), (N'Boys'), (N'Girls'),(N'Miscellaneous');
GO
CREATE TABLE Inventory.StoreItems
(
    ItemNumber nvarchar(10) primary key,
    CategoryID int foreign key
        references Inventory.Categories(CategoryID),
    ItemName nvarchar(60) not null,
    Size nvarchar(20),
    UnitPrice money
);
INSERT INTO Inventory.StoreItems
VALUES(N'264850', 2, N'Long-Sleeve Jersey Dress', N'Petite', 39.95),
      (N'930405', 4, N'Solid Crewneck Tee', N'Medium', 12.95),
      (N'293004', 1, N'Cotton Comfort Open Bottom Pant', N'XLarge', 17.85),
      (N'924515', 1, N'Hooded Full-Zip Sweatshirt', N'S', 69.95),
      (N'405945', 3, N'Plaid Pinpoint Dress Shirt', N'22 35-36', 35.85),
      (N'294936', 2, N'Cool-Dry Soft Cup Bra', N'36D', 15.55),
      (N'294545', 2, N'Ladies Hooded Sweatshirt', N'Medium', 45.75),
      (N'820465', 2, N'Cotton Knit Blazer', N'M', 295.95),
      (N'294694', 2, N'Denim Blazer - Natural Brown', N'Large', 75.85),
      (N'924094', 3, N'Texture-Striped Pleated Dress Pants', N'44x30', 32.85),
      (N'359405', 3, N'Iron-Free Pleated Khaki Pants', N'32x32', 39.95),
      (N'192004', 3, N'Sunglasses', NULL, 15.85);
GO
ItemNumberItemCategoryIDItemNameItemSizeUnitPrice
2648502Long-Sleeve Jersey DressPetite39.95
9304054Solid Crewneck TeeMedium12.95
2930041Cotton Comfort Open Bottom PantXLarge17.85
9245151Hooded Full-Zip SweatshirtS69.95
4059453Plaid Pinpoint Dress Shirt22 35-3635.85
2949362Cool-Dry Soft Cup Bra36D15.55
2945452Ladies Hooded SweatshirtMedium45.75
8204652Cotton Knit BlazerM295.95
2946942Denim Blazer - Natural BrownLarge75.85
9240943Texture-Striped Pleated Dress Pants44x3032.85
3594053Iron-Free Pleated Khaki Pants32x3239.95
1920043Sunglasses 15.85
Imagine you want to create a mechanism of calculating the price of an item after a discount has been applied to it. Such a procedure can be created as follows:
CREATE PROCEDURE Inventory. CalculateNetPrice
@discount Decimal
AS
    SET NOCOUNT ON
    SELECT ItemName, UnitPrice - (UnitPrice * @discount / 100)
    FROM StoreItems;
GO
This can be executed as follows:
Stored Procedure
If you are planning to create a stored procedure that takes an argument and know that the argument will likely have the same value most of the time, you can provide that value as parameter but leave a room for other values of that argument. A value given to an argument is referred to as default. What this implies is that, when the user calls that stored procedure, if the user doesn't provide a value for the argument, the default value would be used.
To create a stored procedure that takes an argument that carries a default value, after declaring the value, on its right side, type = followed by the desired value. Here is an example applied to the above database:
CREATE PROCEDURE Inventory.CalculateDiscountedPrice
@discount decimal = 10.00
AS
    SET NOCOUNT ON
    SELECT ItemName, UnitPrice - (UnitPrice * @discount / 100)
    FROM StoreItems;
GO
When executing a stored procedure that takes a default argument, you don't have to provide a value for the argument if the default value suits you. Based on this, the above stored procedure can be called as follows:
Stored Procedure
If the default value doesn't apply to your current calculation, you can provide a value for the argument. Here is an example:
Stored Procedure
On the other hand, you can ask the database engine to get the default value. To do this, pass the argument as DEFAULT. Here is an example:
Stored Procedure
You can create a stored procedure that takes more than one argument with default values. To provide a default value for each argument, after declaring it, type the desired value to its right side. Here is an example of a stored procedure that takes two arguments, each with a default value:
CREATE PROCEDURE Inventory.CalculateSalePrice
@Discount decimal = 20.00,
@TaxRate  decimal = 7.75
AS
    SET NOCOUNT ON
    SELECT ItemName As [Item Description],
           UnitPrice As [Marked Price],
           UnitPrice * @Discount / 100 As [Discount Amt],
           UnitPrice - (UnitPrice * @Discount / 100) As [After Discount],
           UnitPrice * @TaxRate / 100 As [Tax Amount],
           (UnitPrice * @TaxRate / 100) + UnitPrice - 
           (UnitPrice * @Discount / 100) + (@TaxRate / 100) As [Net Price]
FROM StoreItems;
GO
Here is an example of executing the procedure:
Stored Procedure
When calling a stored procedure that takes more than one argument and all arguments have default values, you don't need to provide a value for each argument, you can provide a value for only one or some of the arguments. The above procedure can be called with one argument as follows:
EXEC CalculateSalePrice 55.00
In this case, the other argument(s) would use their default value.
We saw that, when calling a stored procedure that takes more than one argument, you didn't have to provide the values of the arguments in the exact order they appeared in the procedure, you just had to type the name of each argument and assign it the desired value. In the same way, if a stored procedure takes more than one argument and some of the arguments have default values, when calling it, you can provide the values in the order of your choice, by typing the name of each argument and assigning it the desired value. Based on this, the above stored procedure can be called with only the value of the second argument as follows:
EXEC CalculateSalePrice @TaxRate = 8.55
In this case, the first argument would use its default value.